Soilless Growing
Coco Peat Grow Bag System: Bench, Drain and Drip Setup
Published: October 29, 2026
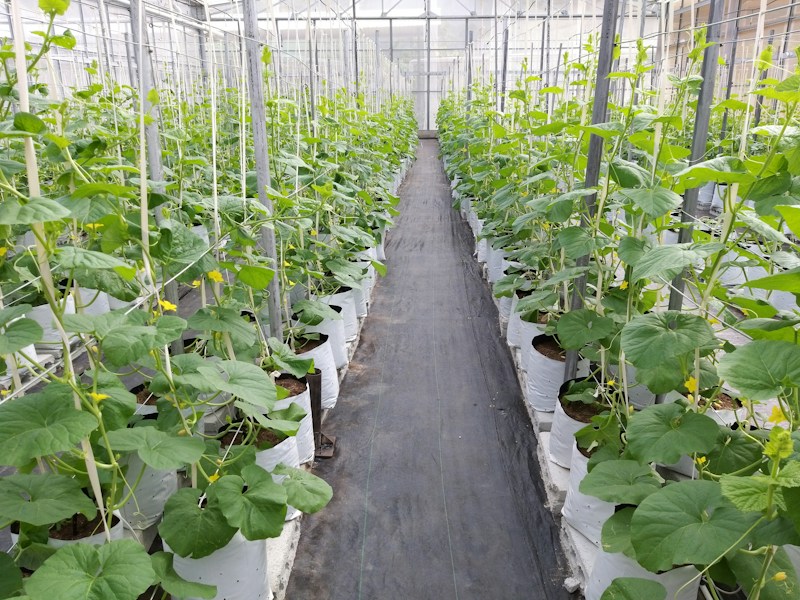
Why use raised benches rather than growing bags on the floor?
Floor-level bag placement is possible but uncommon in commercial protected production. The practical reasons for raised bench systems are strong enough that they have become the standard across most professional greenhouse operations.
Pathogen isolation: Drain water from bags placed on the floor contacts the ground surface, creating a contamination bridge between drainage and soil-borne pathogens. On raised benches, drain water is channelled away without soil contact, breaking this route of spread. For soil-borne diseases including Phytophthora and Fusarium, this is a meaningful structural control.
Harvest ergonomics: For strawberry — and for any crop requiring daily picking — bench height eliminates ground-level harvesting posture. The productivity difference across a full picking season is significant; so is the reduction in physical strain for picking crews.
Air circulation: Bench elevation creates a natural air channel around the crop base. For crops susceptible to Botrytis cinerea, improving basal air movement is one of the simplest and most effective cultural controls available.
Within the range of soilless growing system formats, substrate grow bag systems on raised benches dominate commercial greenhouse production precisely because they combine these practical advantages with the familiarity and error-tolerance that transitioning growers can work with.
How are bench height and slope determined?
Bench dimensions are set by the crop and the drainage requirement — not by convenience or available materials.
Bench height by crop:
- Strawberry, leafy greens, herbs: 70–90 cm. Frequent harvesting at this height is comfortable for most pickers standing or on a step platform; the ergonomic gain over floor-level production is substantial.
- Tomato, pepper, cucumber: 20–40 cm. These crops grow tall on support wires and are accessed from standing height; bench elevation primarily serves drainage rather than ergonomic purposes.
- Raspberry, cane berry: 40–60 cm. A middle height balances picking access with drainage management.
Bench slope: A slope of 1–2% along the bench length is the practical target. On a 10-metre bench, 1% equals 10 cm height difference between the high and low ends — enough for drain water to flow reliably to the collection point without pooling at low spots. Flat benches accumulate drain water in uneven zones; reverse-sloped benches are worse and should be corrected at installation.
Bench width: Single-row bag systems use 20–25 cm bench width; double-row systems 40–50 cm. Double rows increase area utilisation but require that each row drains independently — a single shared drain channel for a double-row bench can mask drainage problems in one row.
Materials: Galvanised steel, aluminium extrusion and durable plastic channel profiles are the common options. Untreated wood holds moisture, supports pathogen growth and degrades structurally; moisture-resistant treated lumber is acceptable but requires periodic inspection.
How are bags positioned and drain holes cut?
Bag positioning and drain hole placement are the two setup details most often done incorrectly, with consequences that persist through the entire production season.
Bag orientation: Bags lie flat on the bench along their long axis. Most commercial grow bags arrive with pre-marked or pre-cut planting holes on the upper surface; these become the transplanting points. The bag’s lower surface should sit flat against the bench without folding or bunching; substrate distribution differences caused by uneven seating create persistent moisture variation within the bag.
Drain hole position: The holes go in the side wall, 1–2 cm above the base of the bag — not in the base. This is the single most common installation error in new substrate systems, and its consequences are structural.
Holes in the base:
- Cause the bag to tilt or rock on the bench as it swells during irrigation
- Leave the bottommost substrate layer permanently saturated and oxygen-depleted
- Create chronic wet-base conditions that invite root disease pathogens
Side holes 1–2 cm up:
- Allow a small permanent moisture reservoir at the very base (beneficial for root stability)
- Let the rest of the substrate drain freely to the target moisture level
- Keep the bag flat and stable on the bench surface
Hole dimensions: 8–12 mm diameter. Larger holes risk substrate particle loss; if needed, a small square of fine plastic mesh placed inside the bag over the hole prevents loss without blocking drainage. Cut at minimum two holes per bag — one near each end — for balanced drainage across the full bag length. A single centred hole consistently leaves the bag ends at different moisture levels than the centre.
How should drip emitters be positioned and selected?
Drip emitter selection and placement determines irrigation uniformity across the substrate — and uniformity determines consistency across plants.
Emitter count: Two emitters per 100 cm bag is the commercial baseline. Each emitter is responsible for wetting approximately half the bag. For bags shorter than 80 cm, one emitter may be sufficient, but verify at season start that wetting reaches the ends. Bags of 120 cm or longer benefit from three emitters placed at regular intervals.
Flow rate: 1–2 litres per hour emitters, applied in multiple short daily cycles, are the standard in substrate systems. High-flow emitters (above 4 L/h) applied in short bursts tend to create a preferential flow channel through the coir rather than distributing laterally, resulting in consistently wet zones under the emitter and drier zones further away. If high-flow emitters are already installed, adding more cycles of shorter duration often improves distribution without replacing hardware.
Emitter placement: Position emitters near planting holes, not at bag ends. The goal is delivery close to the root zone, from which capillary movement distributes moisture outward. Placing emitters at the ends and relying on capillary flow to reach the centre works in homogeneous media but is less reliable with coir, which can have variable density across the bag.
Main line filtration: A minimum 120 mesh filter on the main irrigation line is non-negotiable. Coir particles dislodged during seasonal transitions migrate into lateral lines and block emitters. A blocked emitter goes unnoticed until the plant it serves shows water stress — by which point several irrigation cycles have been missed. Filters require inspection and backflushing at least monthly during production. The fertigation and solution management context for this system is covered in the nutrient solution preparation guide.
What is the correct pre-season soaking procedure?
The soaking sequence before first planting is a brief but important step that prevents two to three weeks of unexplained plant stress.
The correct sequence:
- Place bags on the bench. Connect drip lines and emitters.
- Do not cut drain holes yet.
- Run emitters until each bag is noticeably heavy — 20 to 45 minutes typically. The goal is complete, uniform wetting from one end to the other. Check by pressing along the bag’s length.
- Cut drain holes after full soaking is confirmed.
- Run one short irrigation cycle to flush excess moisture. Measure drain EC and pH.
Why this sequence matters: If drain holes are cut before soaking, the first irrigation water exits through the holes before it fully wets the substrate. Dry zones — typically at the bag ends and in denser sections — remain dry through the entire pre-plant period. Transplants placed into these dry zones show mysterious stress in the first ten to fourteen days. The symptom is real; the cause is rarely identified because the substrate looks wet at the planting hole while being dry two-thirds of the bag away. Following the soaking sequence eliminates this failure mode at zero cost.
After soaking and opening drain holes, verify that drain water pH sits at 5.8–6.2 and that drain EC has fallen below 1.5 mS/cm. If drain EC is high, the substrate has not been adequately flushed of residual potassium — additional flushing before planting is required. The coco peat substrate guide covers the full pre-use preparation protocol.
How should the drain collection system be installed?
Drain collection is both a hygiene requirement and a monitoring tool. Done well, it makes problem detection faster and more precise.
Channel installation: Run a sloped channel (minimum 1% grade) below each bench along the full bench length. Channel cross-section should be sized to carry peak drain flow from all bags simultaneously during maximum irrigation periods. Route each channel to a single collection point where drain water can be sampled and measured.
Block separation: Keep drain streams from different benches, blocks or crop sections separate until they reach their individual collection points. Mixing drain water from multiple benches before measurement loses the ability to identify which bench has a salt accumulation problem, which has reduced drainage, and which is performing correctly. Even simple separation — a bucket per bench row rather than a central collection point — dramatically improves diagnostic capability.
Drain EC monitoring: Measure drain EC at least three times per week during active production. When drain EC consistently exceeds 1.5–2× the applied solution EC, that section needs a fresh-water flush. Log readings by bench and date; patterns over time reveal which bags or sections need replacement and which are performing well.
Recirculation: Recirculating drain water back into the irrigation system is possible and reduces input costs significantly, but requires additional EC-pH correction capacity and more intensive monitoring to prevent pathogen build-up in the return water. For systems entering substrate production for the first time, open-system (drain to waste) operation is more manageable and provides cleaner diagnostic data.
What end-of-season maintenance does the system need?
Proper end-of-season maintenance defines what condition the system enters the next season in — and how much installation work is repeated unnecessarily.
Irrigation lines: After crop removal, flush all lines with a dilute acid solution — citric acid or phosphoric acid — to dissolve mineral scale accumulated inside the laterals. Emitters should be removed individually, inspected and replaced if blocked or deformed. Scale inside lateral lines that goes untreated builds progressively; after two or three seasons without acid flushing, full line replacement often becomes necessary.
Drain channels: Remove coir particle deposits and root fragments. Check channel slope at multiple points along each run; bench settlement or structural movement can change the slope over a season, creating new low points where water accumulates. Correct any deviations before the next planting.
Bench structure: Inspect welds, fasteners and floor anchor points visually. Corrosion is the primary failure mode for galvanised steel benches in humid greenhouse environments; early treatment (wire brushing and zinc paint touch-up) extends service life substantially. Identify any benches with alignment drift and re-level before the next season start.
Substrate bags: Follow the full end-of-season substrate protocol: root debris removal, fresh-water salt flushing until drain EC drops below 1.0 mS/cm, disinfection, and pre-planting EC-pH verification. Bags that complete this protocol in good structural condition are ready for another season; bags showing structural breakdown or holding persistent pathogen history should be replaced.
For how bag setup fits with substrate choice, nutrient management and overall system planning, see the soilless growing hub.
For site-specific planning of coco peat bench system layout, irrigation design and grow bag specification, consultancy support is available.
Frequently asked questions
Why should coco peat bags be on raised benches rather than the floor?
Raised benches isolate drain water from the ground, eliminating cross-contamination between the drainage stream and soil-borne pathogens. They provide ergonomic working height — particularly valuable for strawberry and leafy crops requiring frequent harvesting. Air circulation around the crop base also improves, reducing the humidity conditions that favour Botrytis. Floor-level bags pool drain water in low points; raised systems channel it away cleanly.
What bench height and slope are needed?
Bench height is crop-dependent: 70–90 cm for strawberry and leafy crops (harvest ergonomics priority), 20–40 cm for tomato and pepper (tall crops with support systems), and 40–60 cm for raspberry and cane berry. Along the bench length, a 1–2% slope ensures drain water flows to a collection point without pooling. On a 10-metre bench, 1% slope means a 10 cm height difference end to end — sufficient for reliable self-draining.
Where exactly should drain holes be cut in the bag?
Drain holes are cut in the side wall of the bag, 1–2 cm above the base — not in the base itself. Holes in the base cause the bag to tilt on the bench and leave the bottom substrate layer permanently saturated. Side holes 1–2 cm up allow a small moisture reservoir at the base while freeing the rest of the substrate to drain. Hole diameter of 8–12 mm is sufficient; cut at least two holes per bag, one near each end, for balanced drainage.
How many drip emitters does each bag need?
Two emitters per 100 cm bag is the commercial standard, with each emitter responsible for wetting roughly half the bag length. A single emitter can work for 75 cm bags, but verify at season start that wetting reaches both ends. Bags longer than 120 cm benefit from three emitters. Flow rate of 1–2 litres per hour is typical; high-flow emitters (above 4 L/h) applied in short cycles tend to channel rather than distribute, creating uneven wetting.
What is the correct season-start soaking sequence?
Place bags on the bench and connect drip emitters, but do not cut drain holes yet. Run each emitter until the bag is noticeably heavy — this typically takes 20–45 minutes and may vary across bags. Once full pre-soaking is confirmed, cut the drain holes, then run a short final irrigation cycle to flush out any excess. Cutting holes before soaking allows water to exit before the substrate is fully wetted; dry zones at bag ends cause unexplained plant stress in the first two weeks.
How should drain water be collected and monitored?
Install a sloped drain channel (minimum 1% grade) below each bench to collect and direct runoff to a single collection point. Keep drain streams from different benches or blocks separate — it allows block-level EC monitoring and faster problem identification. Measure drain EC at least three times per week during peak production; when drain EC exceeds 1.5–2× applied solution EC, that block needs a fresh-water flush.
What end-of-season maintenance does the system require?
After crop removal: flush irrigation lines with an acid solution (citric or phosphoric) to dissolve mineral scale, inspect and replace blocked or distorted emitters, clean drain channels of coir debris and root fragments, and check bench structure for corrosion or alignment drift. Substrate bags go through the end-of-season treatment protocol (root cleaning, salt flushing, disinfection, EC-pH verification) before the next planting.
Get consultancy for soilless growing
A program tailored to your field, on-site trials and grower training. Message on WhatsApp for a first consultation.
Author
Ramazan Yıldırım
Senior Agricultural Engineer · Licensed to issue plant-protection prescriptions (Turkish Ministry of Agriculture)
Over 20 years of field experience advising growers across Türkiye and the Turkic states; founder of PR Tarım A.Ş. and Technical Director at Fernabio.
About Ramazan Yıldırım →